lab00 : Getting Started
| num | ready? | description | assigned | due |
|---|---|---|---|---|
| lab00 | true | Getting Started | Mon 01/06 12:00AM | Tue 01/14 08:59AM |
Introduction
Your first lab for this week is an introduction to programming on CSIL and in the Computer Science lab. You will write your first Python program that will print a specific text output on your computer display.
In this and all future labs, make sure to carefully read and follow the instructions!
Goals for this lab
By the time you have completed this lab, you should be able to:
- use the computers in Phelps 3525 (and other labs like CSIL) to do basic things such as:
- perform basic management of directories and files
- create Python programs in IDLE
- submit an assignment using the Gradescope system
This assignment is designed to make sure you are comfortable working in the computing environment and know how to submit your work. It is mostly about mechanics, not concepts. Future labs will require quite a bit more thought!
Step by Step Instructions
Step 1: Verify your College of Engineering Account(s)
Before coming to lab, create a College of Engineering account (also known as a ECI account, or a CSIL account) at this link:
https://accounts.engr.ucsb.edu/create/
We hope you did that—if so, you should be able to use that account to login on the computers in Phelps 3525, as well as the computers in the CSIL lab.
If you ever forget the password to your ECI/CSIL account, you can reset it here:
https://accounts.engr.ucsb.edu/maintain/
If your account doesn’t work, ask a TA for assistance.
Phelps 3525 is only available during your weekly scheduled lab section and during open lab hours.
At other times during the week, you can work in CSIL, the "Computer Science Instructional Lab", which is on the ground floor of Harold Frank Hall. The glass front doors of Harold Frank Hall look out towards the ocean. Stand just outside those doors with your back towards the ocean. The doors to the CSIL lab are just on your right. (If you can’t look over your shoulder and see a great big tree, with the ocean just behind it, you are on the wrong side of the building.) Hours vary–it is open almost all the time during the regular school year.
Step 2: Bring up a “terminal”
On the Linux systems, there are a lot of things we can do with pointing and clicking with the mouse, just like on Windows or Mac. But there are also many things we can only do (or can do more easily) with the command line. It is very helpful to be able to see how files are stored and used, without relying on the graphical interface from the Operating System (OS). To do this, we are going to use a program called “Terminal”.
Let’s bring up a “Terminal” window—a window that gives us access to the Linux “command line”.

Here’s how:
- Find the Applications Menu at the top left of the screen.
- Select System Tools, then Terminal (the icon should look like the image shown on the right).
- A black Terminal Window should pop up.
A Quick Detour: Arrange things
Next, we’ll arrange things for efficiency – when using a programming language, ensuring that the correct windows are simultaneously visible is a huge help!
Try arranging and resizing your windows so that you can see both the browser (these instructions) and your text editor side-by-side. Note To resize the window, double-click the top of the window
- It’s amazing how much more efficient you can be when you don’t need to click to different windows!
- For the artistically or cooking-show inclined: mise en place matters!
OK, back to the lab.
Step 3: Create some directories
At the command prompt, we are going to type several commands to create folders (called "directories") on Linux in which you can store your programs. The commands are shown in the box below—but first, a little explanation.
Each of the cd commands shown below is a command to "change directory"—that is to move into a different folder on the hard drive.
- When you type cd by itself, it takes you to your ‘home directory’.
- cd followed by a directory name (e.g., cd cs8) moves you into a directory that you specified
Each of the mkdir commands "makes a new directory" (i.e. a new folder).
- For example, mkdir cs8 creates a new directory called cs8 inside the current directory.
Each of the pwd commands "print the working directory", i.e. it tells you a path to where you are on the hard drive starting from the root level.
- Your home directory is something like /cs/student/jsmith or /engr/student/mdiaz
- Under that, you might have a directory cs8—that would show up as /cs/student/jsmith/cs8, or /engr/student/mdiaz/cs8
- The slash characters
/show subfolders. (On Windows, they’re usually backward-slashes\or double backward-slashes: not an important difference.)
At the command prompt, type each of these commands. What you type is shown in bold. You should get back exactly the output shown, (except that the part in italics may be different—each user will have something different show up there.)
NOTE: your prompt may not be exactly like the one shown here. Instead of -bash-4.2$ , you might have something like [cgaucho@cstl-15 ~]$ . The cgaucho here is your username, the cstl-15 is where you are logged in, and the ~ is your current directory. Don’t be distracted by this detail.
Now, try typing these commands yourself (we strongly recommend typing instead of copy-paste, so that you start learning these commands).
-bash-4.2$ cd
-bash-4.2$ pwd
/cs/student/yourusername
-bash-4.2$ mkdir cs8
-bash-4.2$ cd cs8
-bash-4.2$ pwd
/cs/student/yourusername/cs8
-bash-4.2$ mkdir lab00
-bash-4.2$ cd lab00
-bash-4.2$ pwd
/cs/student/yourusername/cs8/lab00
-bash-4.2$ cd
-bash-4.2$ pwd
/cs/student/yourusername
Step 4: Checking if it worked
To see if it worked, you can use the file manager on the desktop. Drag any windows that might be covering up the "Home" icon on your desktop—it should be near the upper left corner of the screen. When you double click on this icon, it will bring up your home directory. You should see inside a folder called cs8. If you double-click on that, you should see inside of it a folder called lab00.
Note that you could also use mouse clicks and menu options to create these folders, instead of the command line. Everything you can do with the windows of your OS, you can do at the terminal and command-line. (Actually, you can do much more with the command-line… .) However, we want you to start learning some of the Unix commands—the reasons it is important to know both will become more clear as you move deeper into the study of programming and Computer Science. For example, in CS16 you will have to work on the command line to compile and run your code, so if you learn the Unix commands now, that course will be much easier for you.
Step 5: Bring up the program called IDLE
The preliminaries are done—now we are ready to start saving files for Python!
IDLE is a piece of software that you use to interact with the Python programming language. As we are using Python version 3 in this class, we also use IDLE version 3.
Type the following at the command prompt:
-bash-4.2$ idle3
The window that appears should have the Python Command prompt (>>>) in it.
- This is sometimes called the "Python Command Prompt" window.
- This is also called the "Python Shell" window.
When you have the IDLE window up, you are ready for the next step.
Step 6: Save a file in IDLE
In IDLE, select “File=>New File” to open a new “untitled” window for Python code. Make sure you see the new window and work inside that new file.
When it comes up, click and drag the window by its title bar over to the right of your Python Shell window.
For this lab, there is one goal: write a Python 3 program that prints the text (also called “a string”) Hello, World! as its output.
In this sense, we are following a long tradition: for more than 40 years it has been a tradition to make printing Hello, World! be the first thing you do when learning a new programming language.
In Python 3, this program is very short. It looks like this:
print ('Hello, World!')
Save the file under the name hello.py inside the lab00 folder that you created earlier-—it is very important that is has exactly that name (hello.py), or the Gradescope system will not run your program correctly, resulting in a score of 0.
Note: When you save the file hello.py there should not be any of the >>> marks, which are the IDLE shell prompt.
Make sure that the result (output) of your program matches the following exactly: Hello, World!.
For this and future labs, pay close attention to the spelling, punctuation, capitalization and spacing of the output that your code needs to produce. (Note that there is a space after the comma!)
If it does not match exactly the Gradescope system will not give you full credit for your work.
Now that you entered this program in IDLE, and saved it under the name hello.py, you are ready to see it in action (see the next step).
Step 7: Running your program.
To run your program, select the “Run=>Run Module” option from the menu. You should see the “Hello, World!” message.
If you need a further demonstration of IDLE, you can find one on YouTube. For example: This video starting at 4:53 (That video is for Python 3.1, but the stuff shown in the video is the same across all versions of Python 3.x).
Step 8: Uploading your program to Gradescope
Before you submit your assignment, add a “header comment”. For this and all future labs, add a comment with your name, and information about the course on the first line of the file you are working with:
# Chris Gaucho, for CMPSC 8, Winter 2020
print ('Hello, World!')
Remember to change Chris Gaucho to your name and save your file.
You are encouraged to do that, because it helps someone looking at your code know that you wrote it.
In general, in computer programming, a comment is something that is intended only for human readers of the code, and is otherwise “ignored by the system”. Nearly every programming language has some way to express comments, though the exact rules for formatting of comments–that is, the syntax of comments–differs from one language to another.
In Python, a # starts a comment. Everything from the # to the end of that line is part of the comment and is ignored by the system.
Next, try submitting your program to Gradescope, which is an autograder system we will utilize for this course. You’ll get some immediate feedback on whether you properly followed the instructions.
Creating your Gradescope account
Everyone currently enrolled in the course has been manually added (using your @umail.ucsb.edu accounts) to the Gradescope system. You should have received an email from the Gradescope system asking you to create a password. Once you follow the instructions to set your password, you should have access to the submission system. You should see “CS 8” in your list of Gradescope courses.
The lab assignment “lab00” should appear in your Gradescope dashboard in CS 8. If you haven’t submitted anything for this assignment yet, Gradescope will prompt you to upload your files. This prompt is shown below:

You either can navigate to your file(s) or “drag-and-drop” them into the “Submit Programming Assignment” window.
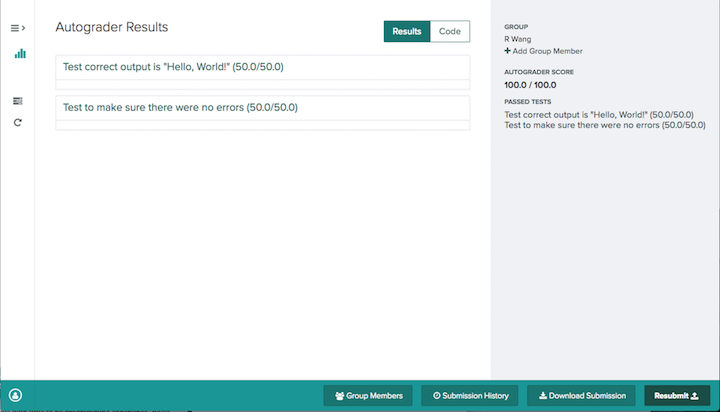
If you already submitted something on Gradescope, it will take you to their “Autograder Results” page. There is a “Resubmit” button on the bottom right that will allow you to update the files for your submission.
For this lab, if everything is correct, you’ll see a successful submission passing all of the autograder tests shown below.
Troubleshooting
If the tests don’t pass, you may get some error message that may or may not be obvious at this point. Don’t worry - if the tests didn’t pass, take a minute to check that
- your print statement is EXACTLY like stated in the lab instructions (including the same spelling, capitalization, spaces, punctuation, etc.)
- the file name is EXACTLY
hello.py.
If your tests didn’t pass and you’re still not sure why you’re getting the error, feel free to ask any of the mentors in the lab.
Final Step: Log Out
Actually, this is the final step of every lab, but we probably won’t remind you again after this one.
In fact, you should do this every time you walk away from a lab computer, either in Phelps 3525 or CSIL.
Here’s how:
- Find the System Menu at the top of the screen.
- Select Log Out
Congratulations! You finished your first lab!
Acknowledgment: Many parts of this lab were adapted from previous CS8 course iterations and the CSforAll examples from HMC.