lab02 : Writing Functions, Tests, and using tkinter
| num | ready? | description | assigned | due |
|---|---|---|---|---|
| lab02 | true | Writing Functions, Tests, and using tkinter | Mon 07/01 12:00AM | Mon 07/08 11:59PM |
In this lab, you’ll get more practice with:
- Wrting functions
- Testing functions with pytest
- Using tkinter module
This lab may be done solo, or in pairs.
Before you begin working on the lab, please decide if you will work solo or with a partner.
If you decide to work with a partner:
- Review the following explanation on pair programming and Falco’s strong-style pair programming.
- Make an agreement to be respectful and work together to maximize your learning benefit.
- There are many ways to do pair programming and we encourage you to:
- Try and find a partner that is of a similar skill level (or similar confidence) with Python programming.
- Try and find a style that works best for you and your partner.
- Many pairs find that switching roles is best done once per “step”.
- Others may find switching roles after 10, 15, or 20 minute increments works better.
The following arrangement is NOT OK.
- Student A and Student B form a pair.
- Student A works on the lab alone on Wednesday night.
- Student B obtains the work Student A did on Thursday night and works alone to finish the lab.
This is NOT how pair programming is done!
There are a few requirements you must follow if you decide to work with a partner:
- Your partner must be enrolled in the same lab section as you.
- You and your partner must agree to work together outside of lab section in case you do not finish the lab during your lab section. You must agree to reserve at least two hours outside of lab section to work together if needed (preferrably during an open lab hour where you can work in Phelps 3525 and ask a mentor for help). You are responsible for exchanging contact information in case you need to reach your partner.
- If you choose to work with a partner for a future lab where pair programming is allowed, then you must choose a partner you have not worked with before.
- You MUST add your partner on Gradescope when submitting your work EACH TIME you submit a file(s). After uploading your file(s) on Gradescope, there is a “Group Members” link at the bottom (or “Add Group Member” under “Groups”) where you can select the partner you are working with. Whoever uploaded the submission must make sure your partner is part of your Group. Click on “Group Members” -> “Add Member” and select your partner from the list.
Once you and your partner are in agreement, choose an initial driver and navigator, and have the driver log into their account.
Step 1: Verify that pytest is working on the machine you plan to work on
Similar to lab01, you can check whether pytest is installed by typing in the following command in the Python shell prompt. If it returns no error message, then pytest is installed. If you get an error, refer back to lab01 for instructions on installing it.
[cgaucho@csil-12 ~]$ python3
Python 3.4.3 (default, Aug 9 2016, 15:36:17) [GCC 5.3.1 20160406 (Red Hat 5.3.1-6)] on linux
Type "help", "copyright", "credits" or "license" for more information.
>>> import pytest
>>>
Step 2: Make a ~/cs8/lab02 folder.
The easiest way to create this is to do the following, which will work from any directory:
mkdir -p ~/cs8/lab02
That form of the mkdir command, with the -p has the advantage that
- It creates the entire path of directories in case any of the intermediate
ones don’t exist (that is, it will create a
~/cs8directory too if it isn’t there yet). - If the directory being create already exists, it won’t complain.
- Since the directory being created starts with
~, it’s an absolute path, and thus the command works regardless of the current directory.
Then, to get yourself into that directory, type:
cd ~/cs8/lab02
Again, since that’s an absolute path, it works from any directory.
Step 3: Create a file called lab02.py in your ~/cs8/lab02 directory
To start out lab02, write the line:
import pytest
Then, copy this function definition into your lab02.py file.
def perimRect(length,width):
   """ Compute perimeter of a rectangle """
   return -42.0 # stub  @@@ replace this stub with the correct code @@@
Then, copy these function definitions into your file. These are a special kind of function called a test case. These particular test cases are written in the style used by the pytest testing framework, and they follow these rules:
- The name of each test cases function must start with
test_. - Each one ends (typically) with a line of code that starts with the keyword
assert, followed by a boolean expression.- If the expression is
True, the test case passes - If the expression if
False, the test case fails
- If the expression is
- Each test case function must have a different name (hence:
test_perimRect_1,test_perimRect_2,test_perimRect_3, etc.) They don’t have to be consecutive numbers—we could use_a,_b,_cor anything really, as long as they are all different. In general though, your parameter, variable, and function names should be descriptive for better readability.
def test_perimRect_1():
   assert perimRect(4,5)==18

def test_perimRect_2():
   assert perimRect(7,3)==20

def test_perimRect_3():
   assert perimRect(2.1,4.3)==pytest.approx(12.8)
Finally, run the code, and ensure that you don’t have any syntax errors in your Python code.
Step 4: Test your code by hand
Because we want to be sure that you continue to practice the skill, test your code by hand first.
That is, select “Run Module” in IDLE, and then type in a few function calls at the Python Shell Prompt. Here are a few:
>>> perimRect(4,5)
-42.0
>>> perimRect(7,3)
-42.0
>>>
Ok, so that’s sort of pointless as long as we haven’t fixed the function yet. The point is that
- you need to know how to check the value of a function call by typing it in.
- you need to see that right now, the function always returns -42.0, no matter what.
There is a reason for that. We call this a “stub value”. It returns the wrong answer on purpose so that we can check that all of the tests fail. We want to see all of the tests fail, THEN see all of the tests pass. That’s the general idea.
- We want so see them all fail when the function is wrong.
- Then if they pass when the function is right, we trust the test.
Step 5: Run pytest on the file so far
As a reminder, you run pytest OUTSIDE of idle, at the regular terminal prompt.
You may find it helpful to bring up a second terminal window and use
cd ~/cs8/lab02
to get into the correct directory. Then use:
python3 -m pytest lab02.py
You should see three test failures. If you do, then you ready to fix the code so that it works, which is the next step.
(If you need a refresher on how to interpret the output of pytest, refer back to lab01)
Step 6: Fixing the code for perimRect
So, if you have failing test cases, the thing to do is fix the code so that the test cases pass.
Of course the formula for the perimiter of a rectangle with length and width is, in math notation: . But you’ll have to convert that into Python, and use the variables length and width to get it to work properly.
Once you have the code correct, try testing both using interactive testing as well as by running pytest.
You are by no means finished with this lab. But, we want to encourage you to make a submission to Gradescope now anyway. Here is why:
-
After you upload your file (and this must be done each time someone uploads a file), you must add your partner (if you’re working with one) on Gradescope by selecting “Group Members” -> “Add Member” and selecting your partner from the list.
-
It will be a way that you can share your work in progress with your pair partner. Both of you will be able to login to Gradescope and access the file(s) you uploaded.
-
It provides a backup copy of your work in case something goes wrong with your computer (yes, this happens and you want to make sure there is a backup somewhere).
-
It provides a staging ground for you to move your file between you and your partner.
-
You also will be able to see some progress towards completion of the lab— partial credit for completion of this step.
Once you’ve submitted and you see that you have 20/60 points, you are ready to continue with the rest of the lab.
Step 7: Write a areaTriangle function and test cases.
You will write your own function areaTriangle(base, height) and some test cases in your lab02.py file. Be sure you define your function’s signature with the exact name shown here. It’s also a good habit to define comments for all the functions you write. Include a comment for areaTriangle to describe what this function does. Note that the function comments have to either be in a string (as explained in the textbook), enclosed in triple single-quotes, or enclosed in triple double-quotes (as shown in the perimRect function). Your function should return the area of a triangle using the base and height parameter values.
You should try to make the function pass the test cases that you put in.
In some cases you’ll be given the test cases. In other cases, you have to supply these test cases yourself.
At each step, you should first try to get the test cases to pass by running pytest at the Unix command line as discussed above.
- Please do this BEFORE submitting to Gradescope.
- Please DO NOT upload your file to Gradesope without testing locally first.
Once you see your tests are passing, THEN submit a version to Gradescope to see if you also pass the test cases the instructor defined in Gradescope.
If you pass your own tests, but NOT the instructor supplied tests, then try to see if you can figure out why. Are there some cases that you did not consider?
In this step, you must define three test cases to test areaTriangle. The code for the first test case looks like this
def test_areaTriangle_1():
	assert areaTriangle(4,5) == 10
The second and third test case should be one that you come up with yourself. The restrictions are:
- the test functions must be called
test_areaTriangle_2andtest_areaTriangle_3 - they should have an
assertstatement - the assert keyword should be followed by a call to
areaTrianglewith different parameter values in each test. This is followed by a test for equality using==, which is followed by the value that you expectareaTriangleto return for those argument values.
Once this is done, then:
- test your code with “Run Module” to make sure your code compiles without errors (i.e. no red messages).
- use
python3 -m pytest lab02.py -k areaTriangleto run just the test cases for theareaRectfunction (there should be three of them, and three skipped test cases for perimRect).
Once everything passes correctly with pytest, submit your lab02.py file to Gradescope again to see if your submission passes the areaTriangle tests. You should see that you now have 40/60 points if the perimRect and areaTriangle tests pass. Remember to add your partner to Group Members for this submission on Gradescope if applicable.
Step 8: Write and test a function using namedtuples.
In this step, you will write a function that computes the price of n copies of a namedtuple representing a Book object. Copy and paste the following code in your lab02.py file.
from collections import namedtuple

Book = namedtuple("Book", "title author price")
b1 = Book("Ready Player One", "Ernest Cline", 16)
Recall from lecture, this is how we defined a Book object with a title, author, and price attribute. We construct a specific book representing the Ready Player One book written by Ernest Cline that costs 16 dollars. We store this specific book representation in the variable b1.
Using this information, write the function computePrice(n, book) that returns the price of n copies of a book. Similar to perimRect and areaTriangle functions, write a brief comment in your computePrice function describing what the function does.
Write three test functions to test if computePrice works as expected. The code for the first test case looks like this
def test_computePrice_1():
	assert computePrice(0, b1) == 0
Write two more test cases, test_computePrice_2 and test_computePrice_3 with different values for n. Be sure to test if your code works with “Run Module” and use python3 -m pytest lab02.py -k computePrice to run just the test cases for the computePrice function.
Once everything passes correctly with pytest, submit your lab02.py file to Gradescope again to see if your submission passes the computePrice tests. You should see that you now have 60/60 points if the perimRect, areaTriangle, and computePrice tests pass. Remember to add your partner to Group Members for this submission on Gradescope if applicable.
Even though Gradescope shows 60/60 if everything works correctly, the lab is not done yet.
Step 9: Using tkinter to draw a face
In this step, we will use the Python module tkinter used to draw simple graphics. This module has many features that you can read about here, but for this step we will only use a small subset of tkinter’s functionality. The goal of this step is not to go through the details of tkinter (this will take more than one quarter of instruction to do so), but to use a simple subset of functionality to draw a face using a single function.
For this step, create a new file called lab02_face.py in your ~/cs8/lab02 directory
First, we will create a canvas to draw things on. Copy and paste the following code in your lab02_face.py.
import tkinter # Imports the tkinter library in your program

window = tkinter.Tk() # Create a window to draw graphics on

canvas = tkinter.Canvas(window, width=500, height=500)
# Create a 500x500 pixel canvas

canvas.pack() # Places the canvas in the window
You can think of the canvas with (x,y) coordinates, but it’s a little different than a typical cartesian coordinate graph. Think of the canvas with an origin point (0,0) as the upper left corner of the window. x values increase as you move right along the window, and y values increase as you move down the window. Any negative x or y value will not be displayed on the window since all coordinates within the canvas should have positive values.
We can draw ovals on our canvas using the create_oval(x1, y1, x2, y2) function. x1 and y1 defines the upper left point and x2 and y2 defines the lower right point of a rectangle. create_oval draws an oval within this rectangle boundary defined by the upper-left and lower-right points.
Copy and paste the following function definition and function call in your lab02_face.py file.
def drawFace():
	""" Draw a face on the canvas """
	# Draw head
	canvas.create_oval(100, 100, 400, 400)

	# TODO: Draw left eye

	# TODO: Draw right eye

	# TODO: Draw mouth

drawFace()
The first thing to note is that drawFace does not return a value. Functions may or may not return a value depending on what they may be used for. In this case, the purpose of drawFace is to simply display something on the screen. Without a return statement in a function, the None type is returned.
Select “Run Module” to see your window and head drawn on it (IDLE creates a graphics window when you run this module. If you don’t see it, it might be hidden behind other windows on your computer screen).
This function already draws a circle with a diamater of 300 pixels representing the face’s head. We can also fill the circle with a color by passing in an optional parameter to create_oval. For example, we can draw a green circle for the head by adding the fill="green" parameter like this
canvas.create_oval(100, 100, 400, 400, fill="green")
tkinter accepts many pre-defined color strings such as "red", "blue", "yellow", "black", "dodger blue", etc. A list of predefined color strings can be found here.
Complete the drawFace() function definition (completing each of the “TODO” parts) by drawing the remaining parts of the face. Your face drawing must
- have the eyes and mouth contained within the head
- have the left and right eye be the same size and color
- the eyes, head, and mouth must be different colors
- the left and right eye must be above the horizontal center of the head
- the mouth must be below the horizontal center of the head
- the left and right eye must be symmetrical with respect to the vertical center of the head
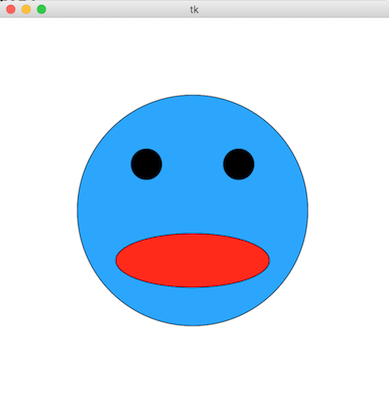
An example face can look like this
Step 10: Uploading your files to Gradescope
Navigate to the Lab assignment “Lab02” on Gradescope and upload your lab02.py and lab02_face.py. Even though Gradescope will not auto-check your drawing, you must upload lab02_face.py file to receive credit for this step. Remember to add your partner to Group Members for this submission on Gradescope if applicable. At this point, if you worked in a pair, it is a good idea for both partners to log into Gradescope and see if you can see the uploaded files for Lab02.
Your Gradescope submission will be autograded out of 60 points. Our TAs will grade your pytest functions and your face drawing manually for the remaining 40 points. This lab is out of 100 points.